Sassanian Persian CR: H:3; L:1; BP:4; Init:5
2 Sassanian Cavalry HC 5(1)0 +2 Lance/Bow
4 Sassanian Cavalry HC 4(1)0 +1 Lance/Bow
2 Lakhmid Cavalry LC 2(0)0 +1 Various
Byzantine CR: H:2; L:2; BP:4; Init:4
2 Skutatoi FT 5(1)1 +1 Spears/Bow
3 Heavy cavalry HC 4(1)0 +1 Swords/Bow
1 Heavy cavalry HC 5(1)0 +1 Lance/Bow
1 Isaurian infantry LI 4(1)2 +1 Javelin
2 Ghassanid cavalry LC 1(0)0 +1 Various
All are key but the Light Infantry.
Also, something I forgot to mention for both Armati replays is that no heavy cavalry is subject to obligatory charge.
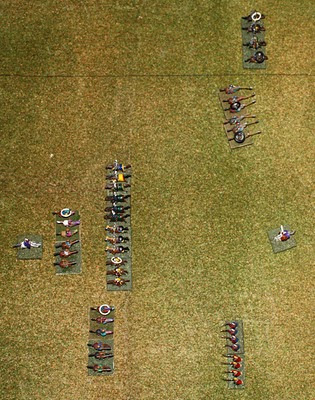
Here is the set up - same as the last game but with smaller units.
Set up - Persians on the left
Turn 1
Persians win initiative. They move the Lakhmids light cavalry their full distance. The FV5 heavy cavalry is wheels to the left and moved forward to support the Lakhmids.
The Byzantines moved up Ghassanid light cavalry to within javelin range of the Lakhmids. The Isaurian light infantry is moved forwards the full distance. The block of heavy cavalry is moved to within missile range of the Persian reserve cavalry (the only place the Byzantines may be able to gain an advantage of 3 cavalry stands vs 2). The Skutatoi infantry is moved up their full distance.
End of turn 1
Turn 2
Missile fire was interesting - The Byzantines received 1 hit on each of the Ghassanid light cavalry, the Light infantry and one of the heavy cavalry; The Persians on one Lakhmid light cavalry, and 2 hits spread over the FV4 heavy cavalry.
Byzantines win the initiative and choose to move last.
The Persians move the Lakhmid light cavalry into contact with the Ghassanids. Their only other move is to charge the FV5 heavy cavalry into the light infantry.
In non-intro scale, the Heavy Cavalry would receive a +1 against the Light Infantry as in that scale, Light Infantry have half the width of most other units. But in Intro this doesn't occur. But two FV5 cavalry with impetus against one FV4 Light Infantry may not last long, even missing the +1 bonus for the cavalry.
The Byzantines move the Skutatoi heavy infantry up so if they want, they could charge (hah - as if they want to). But it does pin the facing Persian Heavy Cavalry.
The Byzantines also move the unit of Heavy Cavalry directly forward the full distance.
For melee the Byzantines choose left to right. The Light Infantry inflicts a hit on one Heavy Cavalry stands and then is subsequently routed by combat with the next stand. The Lakhmids rout both Ghassanid light cavalry stands for no damage to themselves.
End of turn 2
Note flesh rings used for hits, black rings for fatigue.
Turn 3
Missile fire results in a hit for each side for the line of heavy cavalry facing off in the centre.
Byzantines win initiative and choose to move first. They move the heavy cavalry into contact and also move the infantry up further.
The Persians about face the Lakhmids, wheel and move full distance. The FV5 heavy cavalry about faces and is undressed (-1 in melee). The General is moved to support one of the heavy cavalry.
Byzantines choose left to right for melee direction. One hit on each of the Persian HC and two hits in total in return. The Persian general survives.
End of turn 3
Turn 4
Missile fire results in one hit from the Skutatoi heavy infantry onto the Persian heavy cavalry.
Persians win initiative and choose to move first. The Lakhmids wheel 2 and contact the closest heavy
Byzantine heavy cavalry in the flank. This will stop the Byzantine Heavy cavalry stand flanking the Persian heavy cavalry it is facing (which it would have been able to do and then the Persian heavy cavalry stand is fighting at 1 versus everyone). The undressed FV5 heavy cavalry move their full distance towards the rear of the Byzantine Heavy cavalry but do not have the movement rate to make contact.
The Byzantines move the infantry to within 2 of the Persian Heavy Cavalry, again, in case they ever want to charge but they are good blockers.
Persians decide to melee from left to right.
The Persian Lakhmid light cavalry takes a hit (it was the LC 2 versus the HC 1). The Persians lose one heavy cavalry and so does the Byzantines. The Byzantines have reached their breakpoint. Playing out the rest of the melee does not result in any more losses to either side. The Persians win again.
End of turn 4 and the game
Something I forgot that I did mention after the first replay was making the Light Cavalry non-key as the Byzantines are almost certainly going to lose it, But making them key, maybe they should retreat a bit more and fight more defensively as to extend the turn when they are lost and give a possibility of the heavy cavalry in the middle making a difference. Ah well. Food for thought in future rules that make use key units. I am leaning to the fact that for Armati they should be key and I should use them differently.
A view from the Persian side at the end of the game
Verdict
It is a much faster game but does not feel much like Armati. Oh, the melee tactics are still the same but the command and control, which is the essence of Armati, is missing. As there are no divisions with more than 3 stands, much of the tactics and decisions on divisional manoeuvring, splits etc isn't there. I think that I prefer the last game which captured the flavour of Armati more. With the reduced units, there was too much flexibility on movement. I also think that at the scale I am playing that Phil has the right idea - ignore fatigue as it is unlikely to make a difference with this type of game.


.jpg)


No comments:
Post a Comment