Wanting to drag out my 20mm WW2 stuff over the holidays, I looked around for some scenarios to play and settled on Operation Jupiter by Bennett P. Lacy, published by Britton Publishers and available in print or PDF from lulu.com. A collection of 30 skirmish scenarios set on the 10 July 1944 British offensive Operation Jupiter. Recommended.
The skirmish scenarios are designed for final combat but have been scaled down from Company actions. The rules I am going to use, Advance To Cover (ATC) are my own rules and are based for about a battalion on the table, so I just scaled them back up! So 1 figure = 1 section/squad.
It is also designed for a 5'x6' table. when using my rues, I found that using around a 4'x4.5' was all I needed, setup on 1/2 a table tennis table. As per the suggestion in the rules, I doubled all turn requirements. All worked fine and have produced some tense games.
Notes on the rules (skip if not interested in rules development)
I restarted playing WW2 in about 2011 and was using Britannia Miniatures Take Cover!! (review here) which is what I used and loved in the early 2000's. Of course, being a rules tinkerer, I have modified these rules over the last few years, going through various names. I have just settled on Advance to Cover as a ruleset name and am quite happy with the mechanisms as they stand. Operation Jupiter will be an opportunity for any refinement required. They use card based activation; 1d6 for everything; and are derived from Take Cover with the usual spotting, infantry, antitank and indirect fire rules seeming familiar but streamlined. Latest rules are here.
Scenario
This is Game 1 - Three infantry companies, supported by Churchills and dedicated 25pdrs, attack a Farm across open ground. They have 16 turns to do so.
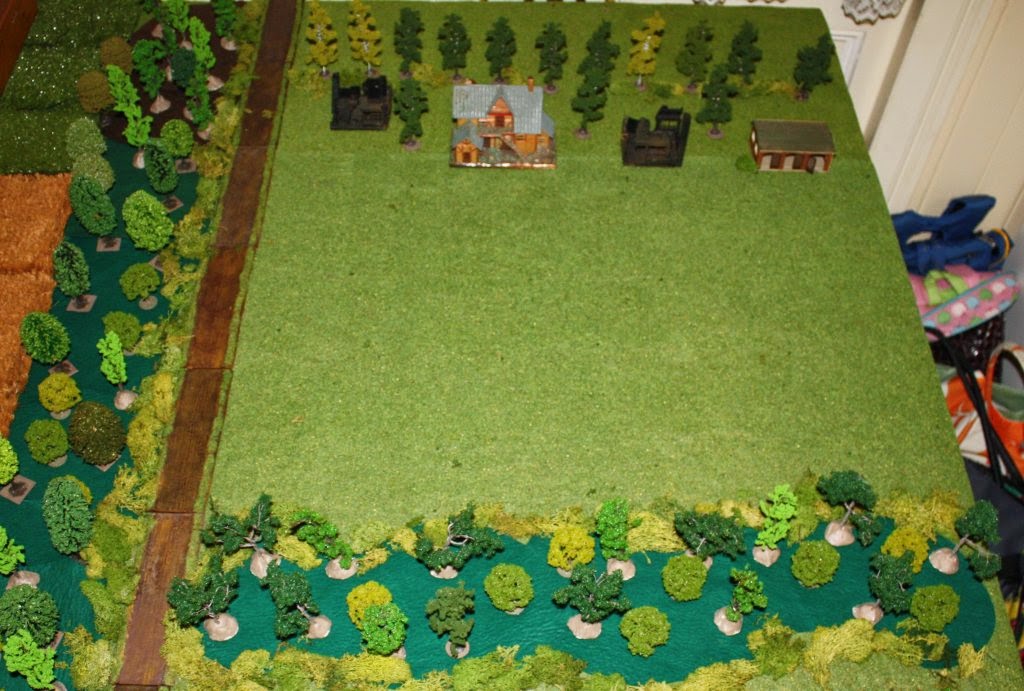 |
| The game board. British start in the woods at the botton and the main building in the centre is the objective. |
British
 |
| The British attackers |
4 figures + 1 radioman
3 companies each
1 CO, 1 PIAT, 1 2" mortar and 9 figures
4 Churchill VII
2 dedicated 2x25pdr fire missions
German
 |
| German defenders |
6 figures + 1 radio
1 Company
1 CO and 9 figures
1 MMG
2 Pak 40
1 Nebelwefer fire mission
The Game
British plan: Advance the Churchills with a plation each in support. Engage the enemy and when reduced, advance the remaining companies. Destroy spotted AT Guns or MG nests with the artillery.
German plan: Engage any tanks as soon as possible; MMG fire at good targets. Infantry to hold fire until required. Rockets to be used when suitable infantry targets are in the open.
I apologise in advance for those wanting a very detailed battle report (and a sigh of relief for thise that did not) - I was having too much fun during the game to write any notes. You are lucky I took photos!
The Germans deploy in foxholes and in the buildings. The anti-tank guns are on their right flank. The Battalion HQ is split between the main building and the line of tress behind the main building as a reserve.
 |
| The German deployment -guns to the right of the photo. |
The German anti-tank guns open up - two hits but no damage due to the Churchill armour. If they were Shermans, the British would be two tanks down at this point. The Churchills spot one of the Pak-40. In ATC (Advance to Cover) a firing anti-tank gun in total concealment over 18" (about 450m) will only be spotted on a 5+, 3+ if in partial concealment.
The activation cards favour the British who fire HE at the Pak-40s for no effect. The Pak-40s fire again but both miss.
British Battalion HQ call in the 25pdrs on the building with Pak-40. There are two 25pdrs, 3 dice each and need a 6+ to hit in hard cover. Three 6's from 6 dice and one Pak-40 is destroyed.
It is turn 6 already of 16 turns and it will take 4-8 turns for the infantry to cross the field (it is a 24" distance, infantry move at 6" but only on their card that will appear about 50% each turn). The British main forces advance out of the wood. And are promptly fired on by the MMG and the squad. This causes one company to lose 4 figures in one attack and are suppressed.
 |
| Company advances out of the wood and promptly depleted and suppressed (green bushes are suppression markers) |
The other Pak40 is destroyed by concentrated direct HE fire from the Churchills.
 |
| The Churchills advancing on the British right. Most of the German defending company can be seen to the left of the picture. |
 |
| Another view of the British advance. They still have all 4 Churchills, and a lot of infantry remaining. |
 |
| British platoon charges into close combat at the objective. Subsequently repulsed. |
 |
| All the remaining German defenders - 1 in the main building (about to be reinforced by the rest of Battalion HQ), 7 of the German company. |

While the German's fire on the British forces in the open, they now only have about 5 figures left in total.. The Churchills pour in fire into the buildings while the infantry continue to advance. A 6 is required to destory a figure; vehicle MGs are 2 dice, and so it the HE...and the advancing British fire as well. It all starts to add up. The German company finally routs with only two figures left. The only remaining unit on the table is the Battalion HQ and a force morale rolls sees them pull back.
 |
| Turn 14. The German company (2 figures left) routed and The Battalion HQ pulls back. Still lots of British infantry. |
The British win on turn 14.
Verdict
Firstly the game - Once the Pak-40s had not taken out any Churchills, the game was a bit of a walkover from a firepower perspective. It was still a little tense though as time was running out for the British to achieve the objective in time. I think if the Pak-40s had KO's at least 1-2 tanks, the British would have failed to dislodge the Germans in time. I found it a balanced scenario.
An after action report for the same scenario using different rules is at Just Jack's BlackHawkHet blog post.
I am finding I am really liking this setup for a game - a few tanks, about 20-30 infantry and maybe some artillery. And a small table scenario. For a larger game, this scenario would likely be about a third of the table, with some other objectives as well. Rather than decide how to split forces to achieve these objectives, there is really only one with a small force. I feel like it is a vignette of what would normally be a larger game. It also feels a like a puzzle - how to best achieve the objective with the forces your have. I have played a few of the Operation Jupiter scenarios and am loving this sort of scenario and game. The size of forces is what I have found over the years I enjoy the most; now I have also found a scenario type I love that matches them.


.jpg)


Nice "small table scenario" and report!
ReplyDeleteThanks Phil, it was fun to play.
DeleteVery nice Shaun! I like the "small Rapid Fire" game. The stylized toy soldier game where the forces represent larger units but the game is played out with small unit tactics. Sounds like it was a balanced scenario despite the fact that the German's got declawed early.
ReplyDeleteYep, I think I have found the size and style of game I really like. I have played the first five of the Operation Jupiter scenarios and they all seem balanced.
DeleteGreat stuff Shaun. I can't believe we both won that fight having to cross all that open ground! That's really funny that you linked to my batrep of the same battle; gotta love my khaki-sprayed buildings! Your 20mm stuff looks great, I'll get there someday ;)
ReplyDeleteV/R,
Jack
If I get to scenario 7, you get a link to your batrep of that as well.
DeleteI know you have some 20mm. You just need to finish painting them and then see the light.
This comment has been removed by the author.
ReplyDeleteNice one Shaun! Always a good sign when taking notes is a chore...BTW I also approve of the Game Title; very catchy
ReplyDeleteI did want to take notes, I really did. "Just one more turn and I'll type something in...oh, I've finished the game!". All the scenarios writeups have titles as catchy as this.
Delete